StoryShape 1.0 · User guide
Getting started
User guide Part 1 of 13
Install StoryShape, make your first project, and learn how your work is saved and kept safe. Everything here works offline, without an account.
Install StoryShape
StoryShape 1.0 is free on Windows, macOS and Linux, and every desktop version opens the same projects. StoryShape for iPad is a $4.99 one-time purchase. Get any of them from the download page.
Mac App Store
- On the download page, choose Get it on the Mac App Store.
- Install StoryShape from the App Store, then open it from Launchpad or your Applications folder.
The App Store keeps this version up to date. It needs an Apple-silicon Mac.
Mac direct download
- On the download page, under Download directly, choose Download for Mac.
- Open the DMG and drag StoryShape to Applications.
- Open StoryShape from Applications.
It needs macOS 12 or later on an Apple-silicon Mac.
Windows (Microsoft Store)
- On the download page, choose Get it from Microsoft Store. This saves StoryShape Installer.exe.
- Open it. It installs StoryShape and opens it when it’s done.
- Next time, open StoryShape from the Start menu.
The Microsoft Store keeps it up to date. It runs on Windows 10 and 11. If your school or workplace blocks the Microsoft Store, use the direct download below.
Windows direct download
- On the download page, under Download directly, choose Download for Windows. Choose Windows on ARM only if your PC has an ARM processor.
- Right-click the ZIP and choose Extract All…. Put the folder somewhere you’ll keep it, such as your user folder.
- Open the extracted folder and run StoryShape.exe.
Windows may ask whether to run StoryShape the first time. Choose More info, then Run anyway. The Microsoft Store version doesn’t ask.
Linux
- On the download page, choose Download for Linux.
- Extract it, for example with
tar -xzf StoryShape-1.0.0-linux-x64.tar.gz. - Run StoryShape from the extracted folder.
It runs on current 64-bit desktop distributions. You can open a project straight from a terminal: ./StoryShape --project="/path/to/My Story.storyproj".
iPad
Buy StoryShape for iPad on the App Store. It needs iPadOS 18 or later. The iPad page explains how it differs from the desktop app.
Check a download. If you’d like to confirm a file arrived intact, its SHA-256 checksum is under File checksums on the download page.
Keep StoryShape up to date
- Store versions (Mac App Store, Microsoft Store, iPad App Store) are updated by the store. They never check for updates themselves.
- Direct downloads check only when you ask. Choose Help → Check for Updates…. StoryShape opens Settings, looks at the published releases on GitHub, and tells you whether a newer version exists for your computer. If one does, choose View GitHub releases to download it. StoryShape never downloads or installs anything in the background.
To install a newer direct download, replace the old app: drag the new StoryShape into Applications on a Mac, or extract the new ZIP or tarball and run it on Windows or Linux. Your projects live elsewhere, so they aren’t touched.
Before you open a project in a newer version, keep a copy of it. If you ever need to go back to an older version, you’ll have one it can open.
The project hub
When StoryShape starts without a project, it shows the project hub. This is home base for your projects.
- New project… makes a new project.
- Open project… opens one you already have.
- Restore a copy… restores a project, checkpoint or readable export into a new, separate project. See Restore a project.
- Browse backup folder… finds checkpoints in a backup folder, even if their original project no longer opens.
- Find a recent project or filename… searches your recent projects by title or location.
- Explore Wonderland saves your own copy of the demo project. See Try the Wonderland demo.
Each recent project shows its title, folder and location, and when you last opened it. Choose Open to open it. The ••• menu has Remove from recent list, which only forgets the entry; it never deletes the project.
If a project has moved or been deleted, its row says Location unavailable and Open is greyed out. Use Open project… to open it from its new place, then remove the old entry.
When a project is open, the hub also shows a Current project box with Backups & recovery…, Save checkpoint…, Import manuscript…, Import Scrivener… and Export manuscript…. Choose Return to project to go back to it.
To open the hub at any time, choose Projects in the top bar, or File → Project Library… (Ctrl+Shift+O).
Create a project
- In the project hub, choose New project…, or choose File → New Project… (Ctrl+N).
- Choose where to keep the project. StoryShape suggests your Documents folder.
- Type a name. The name becomes the project’s title, so “The Glass Orchard” makes The Glass Orchard.storyproj.
- Choose Create project.
Your new project opens in Write, ready to type. It starts with a book called Book One, a chapter called Chapter One, a scene called First scene, and a board called Ideas board. Rename any of them whenever you like.
Tip: use a project for a whole series if the books share a world. Each book has its own chapters and scenes, and the World is shared by all of them.
Open a project
- Choose Open project… in the hub, or File → Open Project… (Ctrl+O).
- Select the project’s
.storyprojfolder itself (on a Mac it looks like a single document), then choose Open project.
On a Mac you can also double-click a project in the Finder. On Windows, a project you’ve opened before shows the StoryShape icon in File Explorer.
StoryShape has one project open at a time, and each project reopens at the window size and position you last used for it.
If you’re editing and try to open another project, StoryShape asks you to save or discard your edits first.
Try the Wonderland demo
The Wonderland demo is a complete, editable example project. It uses the first chapter of Lewis Carroll’s Alice’s Adventures in Wonderland (public domain, from Project Gutenberg) in five scenes, with illustrative planning and Wiki notes.
- Choose Help → Explore Wonderland Demo…, or Save a demo copy… on the hub’s Explore Wonderland card.
- Choose where to save it. StoryShape suggests My Wonderland Demo.storyproj.
- Choose Save demo copy.
The demo is always your own copy, so explore freely. It includes:
- five scenes in 1. Down the Rabbit-Hole;
- a plot, Chapter I · Curiosity to the garden door, with seven connected cards;
- a board, Chapter I · Questions on the wall, whose START HERE note is a good first stop;
- three ideas, starting with Start here · explore the workspaces;
- thirteen World entries with relationships, captured passages and a journey map with pins;
- revision tasks and two saved scene snapshots.
Find your way around
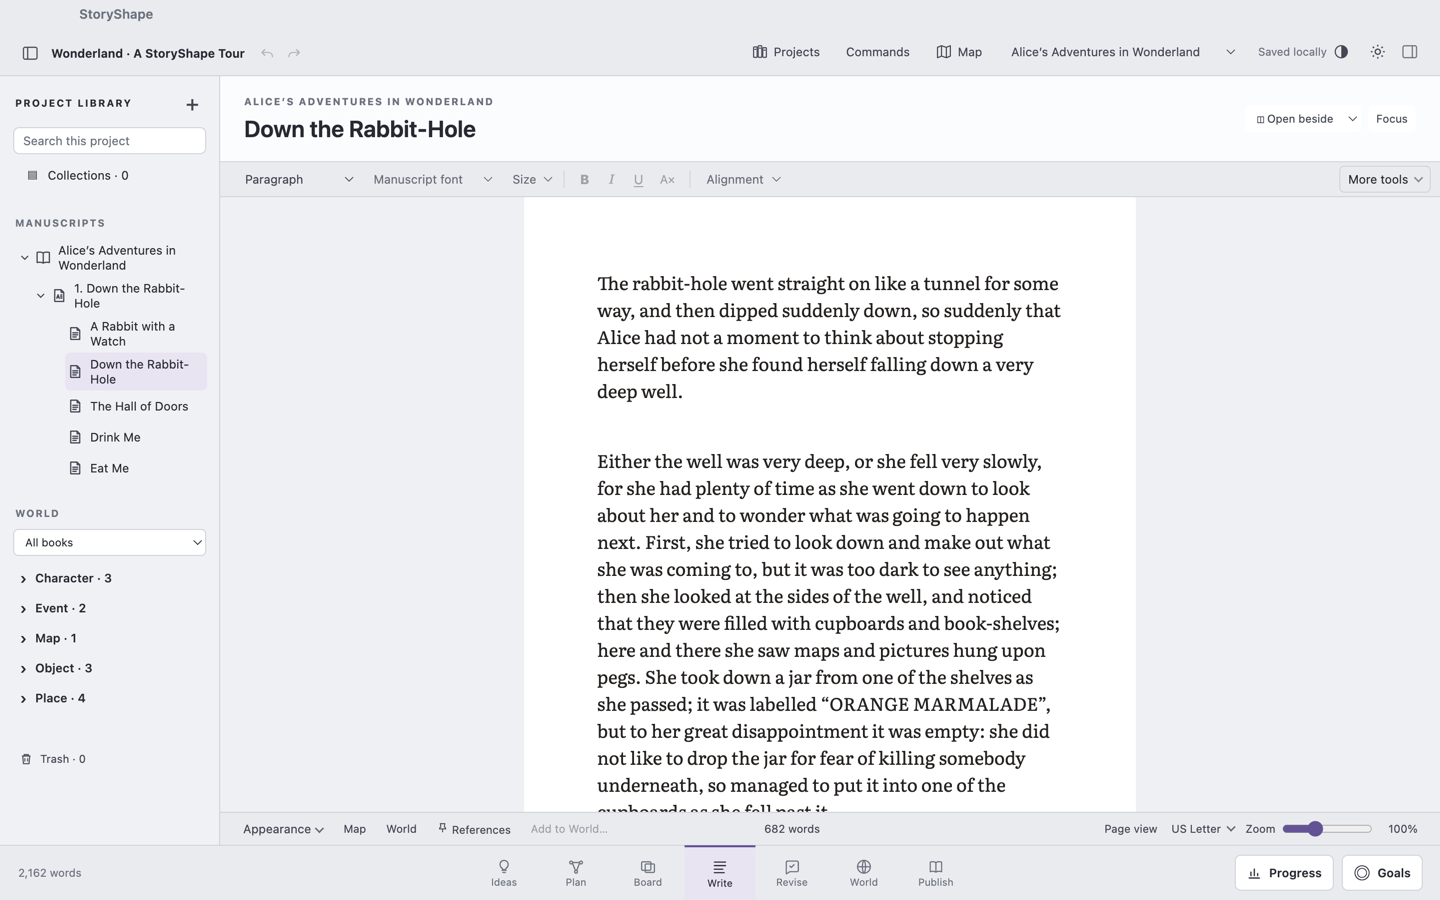
The top bar, from left to right:
- Show project library / Hide project library toggles the left sidebar.
- The project title, then Undo and Redo.
- Projects opens the project hub.
- To-do shows today’s words, your deadlines and your own to-dos. See Your to-do list.
- Commands opens the command palette.
- Map opens a floating map reference. It appears once the project has a map.
- In Plan, Write and Revise, a book menu chooses which book you’re working in. In Publish it chooses the book to publish.
- The save status: Saved locally, Saving… or Read-only.
- The Appearance menu (the half-circle icon) switches themes, and the gear opens Settings.
- Show inspector / Hide inspector toggles the right-hand panel.
The project library on the left shows what belongs to the current workspace: books, chapters and scenes in Write; boards and ideas in Ideas and Board; World entries in World. Search this project finds anything by title or text, Collections opens your saved collections, and Trash is at the bottom.
The inspector on the right shows details for whatever you’ve selected, such as a scene’s status, word count and story context. Word targets and deadlines show as one line there, with Edit in Deadlines to change them. Drag the edges between panes to resize them. StoryShape remembers the sizes for each workspace.
The footer shows the project’s manuscript word count, the seven workspace tabs, and the Progress and Goals buttons.
| Workspace | What it’s for | Shortcut |
|---|---|---|
| Ideas | Premises, questions and fragments you’re not sure about yet | Ctrl+1 |
| Plan | Plots, cards, timelines, scene planning and word targets | Ctrl+2 |
| Board | Freely placed notes and images | Ctrl+3 |
| Write | Drafting scenes, chapters and books | Ctrl+4 |
| Revise | Revision tasks, comments, markup, passes and snapshots | Ctrl+5 |
| World | Your Wiki: characters, places, lore, maps and glossary | Ctrl+6 |
| Publish | Paperback interior PDF and EPUB ebook | Ctrl+7 |
Use only the workspaces that help you. You don’t have to draft in StoryShape to build a series bible, and you don’t have to plan to write.
Menus. On a Mac, the menu bar is at the top of the screen as usual. On Windows and Linux, the menu bar stays hidden until you press Alt.
Commands. Press Ctrl+Shift+P, or choose Commands in the top bar, and type what you want to do, such as “split scene”, “timeline” or “restore”. Commands that can’t run yet explain what they need. See the command palette.
Help. Help → StoryShape Guide… opens a short offline guide inside the app (F1 on Windows and Linux). This website guide is the complete version.
Shortcuts in this guide are written for Windows and Linux. On a Mac, use ⌘ wherever you see Ctrl, unless the guide says otherwise. The shortcuts table lists both.
What a .storyproj project is
A StoryShape project is a folder whose name ends in .storyproj. On a Mac, Finder shows it as a single document. On Windows and Linux it is an ordinary folder.
Inside are:
project.sqlite, the project database with your writing, plans, World and history;manifest.json, which identifies the project and its format;Assets, with images, maps, covers and other files you’ve added;Backups, where automatic checkpoints and milestones go unless you choose a separate backup folder.
You may also see a few small working files, such as .writer.lock while the project is open.
Keep the folder together. To move or copy a project, close it in StoryShape first, then move or copy the whole .storyproj folder. Don’t edit or rename the files inside it.
The same project opens in StoryShape on Windows, macOS, Linux and iPad. Moving to the iPad is covered on the iPad page.
Where your files live
- Projects live wherever you put them. StoryShape doesn’t keep a hidden copy.
- Automatic checkpoints go in the project’s own
Backupsfolder, unless you choose a separate backup folder. - Preferences for this computer, such as theme, interface scale, page view, pane sizes, recent projects and where each board was scrolled, are kept by StoryShape on this computer. They don’t change your story, and they don’t travel with the project.
- Preferences that travel with the project, such as spelling, the project dictionary, paragraph styles, export presets and publishing settings, are saved inside the project.
The privacy page lists the exact folders on each system.
Cloud folders. You can keep projects in a folder synced by iCloud Drive, OneDrive, Dropbox or similar. That’s your choice, and that service may receive what you put there. Open a project on only one computer at a time, and let syncing finish before opening it elsewhere.
How saving works
You don’t need to save by hand.
- Scene text saves itself about a second after you stop typing. The top bar shows Saving…, then Saved locally.
- Structure changes, such as moving, renaming, importing or moving to Trash, save straight away.
- Forms, such as an idea, a Board note, a World page or a card, have their own Save buttons. If you try to leave one with unsaved changes, StoryShape asks you to save or discard first.
File → Save (Ctrl+S) saves your drafts immediately in Write. Elsewhere it reminds you that StoryShape saves as you go.
When you close StoryShape with unsaved edits, it asks whether to Save and close, Keep writing or Discard and close.
Undo (Ctrl+Z) and Redo (Ctrl+Y on Windows and Linux, ⌘⇧Z on a Mac) work across saves while the project is open.
Copies, checkpoints and backups
StoryShape has several ways to keep a safe copy. They do different jobs.
| Tool | What it does | Where |
|---|---|---|
| Automatic checkpoints | A verified copy of the saved project, checked every 15 minutes when something has changed | File → Backups & Recovery… |
| Protected milestone | A named copy, such as “First draft complete”, that automatic tidying never removes | Backups & Recovery… → Preserve milestone… |
| Save Checkpoint… | A complete standalone copy of the project, saved wherever you choose | File → Save Checkpoint… |
| Save an Editable Copy… | A new copy of the project that becomes the project you’re working in | File → Save an Editable Copy… |
| Export Readable Project… | A folder of linked Markdown pages anyone can read, which can also be restored | File → Export Readable Project… |
| Snapshots | Named versions of one scene that you can compare and restore | Revise |
Set up backups
- Choose File → Backups & Recovery….
- Open Backup settings.
- Leave Automatic checkpoints on. StoryShape checks every 15 minutes; if the saved project has changed, it makes a new verified checkpoint.
- Choose Choose separate folder… and pick a folder outside the project, ideally on another drive. Choose Use this folder.
- Adjust how many checkpoints to keep, if you like, then choose Apply settings.
The retention settings are:
- Recent 15-minute: how many recent checkpoints to keep (default 4).
- Hourly: one per hour, for this many hours (default 24).
- Daily: one per day, for this many days (default 30).
- Budget (MB): the most space checkpoints may use (default 2147 MB, about 2 GB).
The newest verified checkpoint is always kept, even if it’s over budget. Checkpoint now makes one immediately.
Why a separate folder matters. By default, checkpoints are saved inside the project. That protects you from mistakes, but not from losing the disk. A separate folder on another drive protects you from both. New checkpoints go to the new folder; earlier ones stay where they were. Use project folder switches back.
Preserve a milestone
- In Backups & Recovery…, choose Preserve milestone….
- Give it a Milestone title, such as “Sent to editor”, and an optional note.
- Choose Preserve saved project.
Milestones are listed as Protected milestone and are never removed automatically.
Save a checkpoint anywhere
File → Save Checkpoint… saves a complete, standalone copy of the saved project to a place you choose, named with the date and time. It doesn’t open the copy. Use it before a big change, or to keep a copy on a USB drive.
Keep an independent backup too. StoryShape’s tools are good, but keep a copy of important work somewhere else entirely, such as another drive or a backup service.
Restore a project
Restoring never overwrites anything. It always creates a new, separate project, and the source stays exactly as it was.
From Backups & Recovery
- Choose File → Backups & Recovery….
- Under Local recovery points, select a checkpoint or milestone. StoryShape shows what it contains: words and scenes, attachments and records, and whether anything needs attention.
- Choose Restore into separate copy…, choose a name and place, then Restore copy.
The restored copy opens. Check it, then carry on working in whichever project you prefer.
From any project, checkpoint or readable export
- Choose Restore a copy… in the project hub, or File → Restore Project….
- Choose a StoryShape project, checkpoint or readable export, then Review.
- Read the summary under Review before restoring.
- Choose Restore into separate copy…, then Restore copy.
If the source changes between your review and the restore, StoryShape stops and asks you to review it again.
When the original won’t open
Choose Browse backup folder… in the project hub, then select the backup folder or the project whose Backups folder you want. StoryShape lists the readable checkpoints and milestones it finds under Available copies. Choose one and restore it into a separate copy. The backup stays where it was, so you can try again.
Trash
Moving anything to Trash keeps it inside the project, with its links. Nothing in Trash counts toward your word totals.
- Choose Trash at the bottom of the project library.
- Choose Restore beside the item.
Restoring a book or chapter also brings back what it contains. If an item’s parent is also in Trash, StoryShape says Restore its parent first.
StoryShape 1.0 doesn’t permanently delete items from Trash.
When a project opens read-only
Sometimes a project opens for reading only. The top bar says Read-only, and a notice explains why. Hover over Read-only to see the reason again.
- It’s open somewhere else. Only one copy of StoryShape can edit a project at a time. Close it in the other window, edition or computer, then open it again.
- It’s a recovery point. Checkpoints and milestones open read-only so they stay intact. Restore one into a separate copy to edit it.
- The folder isn’t writable. Check the folder’s permissions, or that the drive isn’t read-only.
You can still read, search, preview and export a read-only project. To edit it as it is, choose Create editable copy… in the project hub, or File → Save an Editable Copy….
When a save needs attention
If StoryShape can’t save, for example because a drive was unplugged, the top bar shows Not saved. Keep StoryShape open; your text stays in the window.
- Choose Retry once the project’s location is available again.
- Or choose Save into a new copy…. StoryShape copies the project, adds your unsaved edits, and opens the copy. The original isn’t changed.
If Backup needs attention appears in the top bar, a checkpoint didn’t work. Choose it to open Backups & Recovery and see what happened.
More fixes are on the troubleshooting page.