StoryShape 1.0 · User guide
Plan
User guide Part 3 of 13
Plan is where a story's shape comes together. Lay out cards on a plot board, connect them, look at the plan five different ways, and set objectives, word targets and deadlines for every book, chapter and scene.
Plots and the manuscript
Open Plan from the footer tabs, or press Ctrl+2.
Two things live in Plan, and they’re deliberately separate:
- The manuscript: your books, chapters and scenes, in reading order.
- Plots: boards of cards for beats, events and decisions. A card can link to the scenes that carry it, but it never holds the scene’s prose.
So you can rearrange a plot without moving a single scene, and a scene linked to two cards is never counted twice. A project can have as many plots as you like, each for the whole project or for one book.
Use the view switcher at the top of Plan:
| View | Shows |
|---|---|
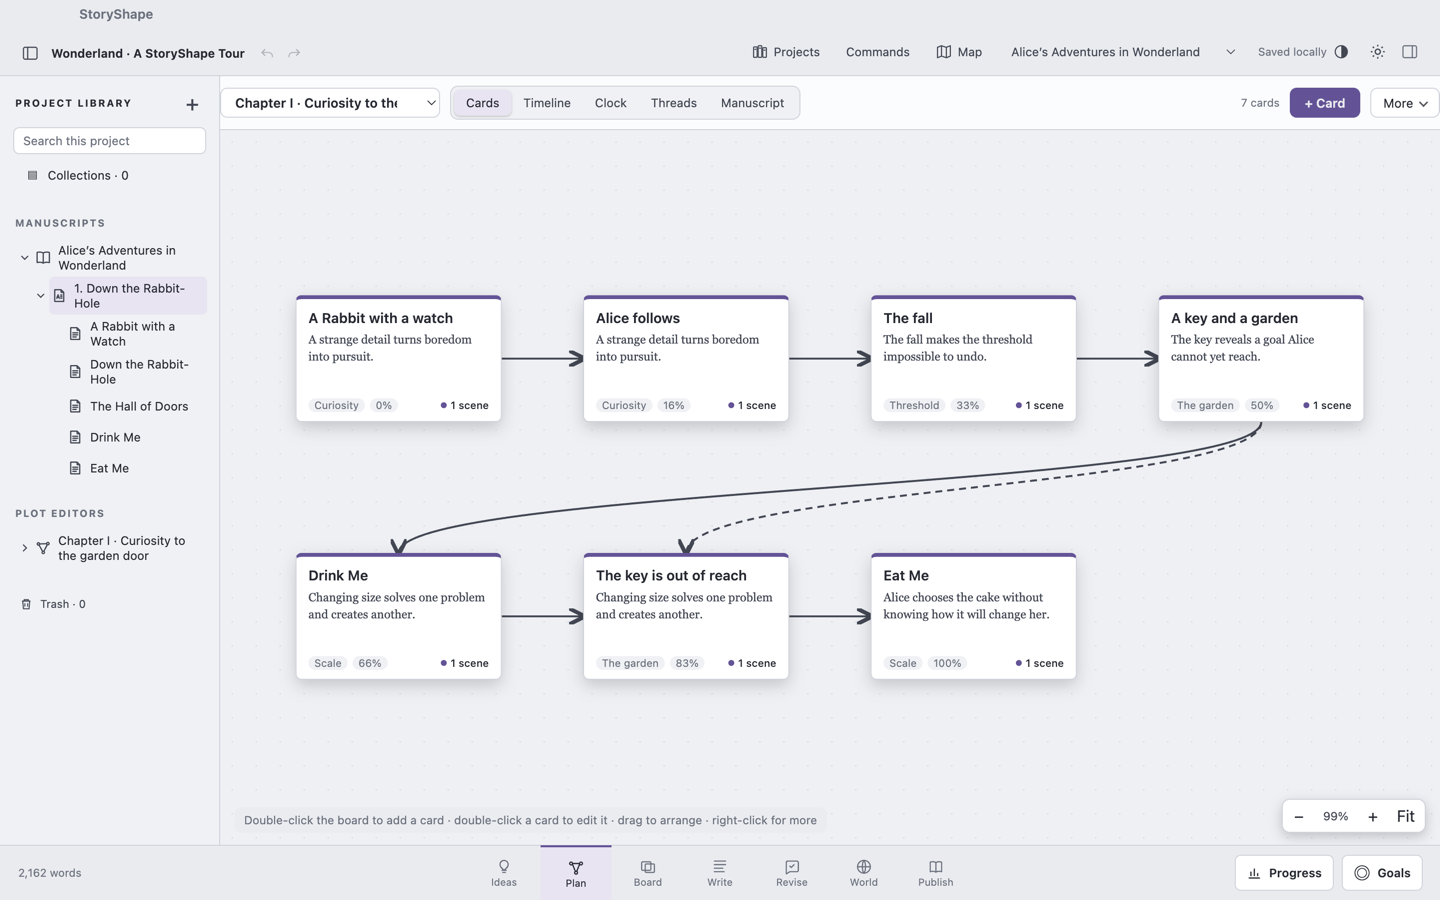
| Cards | The plot as a board of cards and arrows |
| Timeline | Cards in lanes, by manuscript position or story time |
| Clock | Cards around a circular story clock |
| Threads | Cards grouped by story thread |
| Manuscript | Books, chapters and scenes as a planning table or scene cards |
The Plot menu beside the views chooses which plot you’re looking at. Plan remembers the last view you used.
Start a plot
- Choose More → New plot…, or New plot… at the bottom of the Plot menu. A new project with no plot shows the choices straight away.
- Under Choose how your plot starts, pick a structure.
- Give it a Plot name. If the project has books, choose whether it Belongs to the Whole project or one book.
- Choose Create plot.
Every structure becomes ordinary cards you can rename, rearrange, add to or delete.
| Structure | Starts with |
|---|---|
| Blank plot | An empty board for your own structure |
| Three-act structure | Act I — Setup, First turning point, Act II — Confrontation, Midpoint, Second turning point, Act III — Resolution |
| Save the Cat | Fifteen beats, from Opening Image and Theme Stated through All Is Lost and Dark Night of the Soul to Finale and Final Image |
| Hero’s Journey | Departure, Initiation and Return, to expand |
| Story clock | Opening, First shift, Midpoint, Final turn and Resolution, spaced around the clock |
| Branching timeline | A decision that branches into Outcome A and Outcome B, then rejoins at a shared ending, with a ready-made scenario |
Each card in a structure comes with a guiding question, shown on the card until you write your own notes. Cards are joined in order with Sequence connections.
Save your own structure
When a plot works well, reuse it. Choose More → Save this plot as a template…, name it, and choose Save template. It saves the cards, their positions, connections and scenarios, but not their links to scenes or World pages. Your templates appear in the gallery marked yours, where you can Rename… them or Move to Trash. Plots already made from a template aren’t changed.
Cards
Add and edit cards
- Double-click an empty part of the board, choose + Card, or right-click the board and choose New card here.
- Type the title (“What happens?”) and optional notes. Press Enter to save or Esc to cancel. Clicking away also saves.
- To edit a card again, double-click it, press F2, or right-click it and choose Edit on the card.
The card inspector
Select a card to see its details in the inspector. Changes save when you leave each field.
- Notes — what happens, and why it matters.
- Kind — Beat, Event, Decision or Placeholder. Decision cards can start scenarios.
- Progress % — where the card falls in the story, from 0 to 100. The Clock uses it.
- Story thread — for example “Main story” or a subplot’s name. Timeline lanes and the Threads view use it.
- Plot time — an Override story time and an optional Label, if you don’t want the card to follow its linked scenes.
- Scenes & World — the scenes and World pages this card is linked to.
- Connections — arrows in and out of this card.
- Move card to Trash.
Turn a card into a scene
- Select the card. Under Scenes & World, check the new scene’s title (it starts as the card’s title).
- Choose where to Add the scene to: the end of a book, or inside a chapter.
- Choose Create scene.
The empty scene is linked to the card, ready to write. To link a scene or page you already have, use Link a scene or World page…. The × beside a link removes the link only, never the scene.
The card’s footer shows 1 scene, 2 scenes or No scene, and its right-click menu can Open scene for up to five linked scenes. With nothing selected, the inspector lists Cards without a scene.
Connections
Arrows show what leads where. Each connection has a type:
| Type | Use it for |
|---|---|
| Sequence | One thing leads to the next (a solid arrow) |
| Parallel | Things that happen alongside each other |
| Alternative | A different path, such as a branch outcome |
| Setup/payoff | Something planted early that pays off later |
| Reference | A callback or loose link |
To draw one:
- Click the dot on the right edge of a card. (The dots appear once a plot has two or more cards.)
- Click the card it leads to.
While connecting, a banner lets you change the type or Cancel. You can also right-click a card and choose Start a connection from here, then Finish the connection here on another, or use Leads to… and Connect in the inspector.
More → New connections sets which type new arrows get on this plot.
Click an arrow to adjust it: Add bend for up to eight segments, drag the bend handles, then Save route. Reset arrow returns it to the automatic route, and Edit connection… changes its type, label or direction.
No loops in a sequence. A chain of Sequence arrows can’t loop back on itself. For a callback, use a Reference or Setup/payoff connection instead.
Move around the board
| To | Do this |
|---|---|
| Pan | Drag the background, or scroll. Shift+scroll pans sideways |
| Zoom | Hold Ctrl (⌘ on a Mac) and scroll, or use −, + and Fit in the corner |
| Select several cards | Shift-drag a box, or Ctrl-click or Shift-click cards |
| Select every card | Ctrl+A |
| Nudge the selection | Arrow keys (1 point), or Shift+arrow keys (10 points) |
| Move to Trash | Delete or Backspace. Cards go to Trash with their connections |
| Cancel or clear | Esc |
Zoom runs from 5% to 400%. Each plot remembers its zoom and position on this computer. More → Fit every card in view and Centre on the selection help you find your place.
If cards have drifted too far apart to fit, choose More → Recover layout…. Pick Center graph, keep spacing or Arrange graph in a grid, and choose Apply layout. Only positions change.
Timeline
The Timeline puts cards in lanes, one lane per story thread.
- Choose Manuscript position to place cards by where their linked scenes start in the manuscript, measured in words. Cards with no linked scene sit in an unscheduled row.
- Choose Authored story time to place cards by when they happen in the story. A card uses its own Plot time override if it has one, otherwise the times of its linked scenes. Undated cards stay unscheduled.
Switch between Canvas and List, and zoom from 50% to 200%. Dragging a card on the timeline changes only where it’s drawn, never its story time or manuscript order. Restore computed positions puts everything back.
Use the command palette’s Show timeline to jump straight here.
Clock
The Clock shows the plot as a circle, with numbered markers in card order. A marker’s place comes from its card’s Progress %.
Drag a marker around the clock to set where it falls in the story, or select it and use the arrow keys (1%, or 5% with Shift). A numbered list beside the clock names each marker.
Threads
Threads groups cards into columns by Story thread, so you can see each subplot on its own. A card with no thread goes under Main story. Set a card’s thread in the inspector.
The command palette calls this Show plot-thread matrix.
Manuscript view and the scene planner
Choose Manuscript to plan the books, chapters and scenes themselves. Switch between Table and Scene cards.
The table shows each item’s Words, Target and Remaining (when word goals are on), Story objective and Status. Totals for the project and the first book sit above. + Add creates a book, chapter or scene.
Select a chapter or scene to edit it in PLAN DETAILS:
- Status — Not started, Drafting, Revising, Complete, Unresolved or Resolved.
- Word target — see word targets.
- Include in manuscript — whether it counts toward totals and exports.
- Story context — Plot thread, Story time (optional), Point of view and Location (chosen from your World entries), and, for scenes, Edit scene people… to record who is present and who is only discussed.
- Draft stage — Not set, First draft, Rough draft, Revision pass, Editing pass or Final draft, with a Pass number for revision and editing passes.
- Story objective — what changes in this part of the story.
- Story checklist — small tasks for this book, chapter or scene. Type in Add a story task and press Enter; tick tasks off as you go.
- Tags.
Choose Save plan to keep your changes, or Reset. The same fields appear in the inspector in Write, under Open full chapter plan….
Word targets, budgets and deadlines
Word targets and deadlines are optional, and they all live in one place: Goals → Deadlines. PLAN DETAILS and the inspector show a one-line summary (words so far against the target, the due date and the pace) with an Edit in Deadlines button that opens that item’s row.
- Choose Goals in the footer, then the Deadlines tab.
- Choose Everything to see the project, every book, chapter and scene, and your revision passes, or pick one from Add a deadline to.
- Choose Edit (or Add) on its row, then set:
- Target from — A number I set, or Adding up its parts, the total of its included chapters’ or scenes’ targets.
- Target words.
- Due date, the Writing days you’ll write on (Monday to Friday by default), and whether to Write on the due date too.
- Choose Save deadline.
Each row shows the words so far, the due date and the pace, such as “About 850 words a day”. Deadlines due this week are marked amber, and overdue ones red. When the target is met it says Target reached; if no writing days remain, it says Pick a later date. With deadlines hides everything without one.
A revision pass has a due date but no word target. It’s done when you mark it Complete in Revise.
Share a budget among chapters
In the inspector for a book or chapter, CHILD BUDGETS shows how much of the parent’s target is allocated. Choose Distribute budget…, pick All included children or Only children without a budget, and choose Apply. Each child gets an equal share.
To hide every target and deadline without deleting them, turn off Show word goals and target prompts in Workspace → Writing Preferences & Spelling…. See Writing progress and goals.
Story chronology
Reading order and story order are often different. More → Story chronology… shows When events happen.
- Choose a Book, and an Order: Story chronology or Manuscript order.
- Choose Timing… beside a scene.
- Pick Fixed time, Approximate range, or Relative to a scene (with an Anchor scene and an offset; negative offsets mean before the anchor). Or tick Leave this scene unscheduled.
- Add a Time label if you like, and choose Save timing.
The Unit (Days by default) is a label for the numbers you use. Changing it doesn’t convert existing values.
Beats, connections and choices
More → Beats, connections & choices… opens a tidy list view of the plot, with three tabs.
Connections tab
Every connection as From → To, with its type and label. Edit… changes the Meaning (type), Branch / connection label, or swaps direction with ⇄.
Health tab
Health checks the plot for problems, such as a connection to a card that’s gone, a sequence loop, a duplicate connection, or a link to a scene that’s no longer available. Each issue has a repair button. Choosing one shows Current planning data beside After this repair, and nothing changes until you choose Apply repair. Scan again checks once more.
Scenarios
Scenarios describe branches: a decision, its possible outcomes, and the cards each outcome includes.
- Make sure the plot has a card whose Kind is Decision.
- On the Scenarios tab, choose Add scenario….
- Give it a Scenario title, choose the Decision, name at least two outcomes, and tick the cards that belong to each. Choose Save scenario.
- Set the Planned outcome to the one you’re writing, or leave it Undecided.
Preview linked scene inclusion… shows which linked scenes would be included in or excluded from the manuscript for the chosen outcome. Choose Apply scene inclusion to switch their Include in manuscript settings.
Find missing planning items
If a plot’s book was moved to Trash, its cards can become unavailable. Workspace → Planning Recovery… (or More → Find missing plots or cards…) lists Unavailable planning items. Tick them, choose where to Move to (an existing plot or a new one), Preview, then Reattach items. Recover whole plots separately from cards and connections.