StoryShape 1.0 · User guide
World
User guide Part 7 of 13
World is your series bible, a Wiki for the people, places and story details that connect your books. Pages link to each other, to maps, and back to the exact passages they came from.
The World home
Open World from the footer tabs, or press Ctrl+6.
World opens on its Home, which shows:
- Start here — pages you’ve chosen to feature. Open any page and choose Feature on World home to put it here.
- Explore by topic — one card per entry type, such as Character or Place, with how many pages each has.
- Recently edited pages — the six you changed last.
Browse all N pages lists everything. Home in the toolbar always brings you back.
The project library in World lists every entry grouped by type, with a book filter at the top.
Create a World page
- Choose New entry… in the World toolbar, or New page… on the home.
- Type a Name.
- Choose a Template, or Blank entry and type a Type such as Character, Place, Event, Object, Lore or Note.
- Add a Description if you like.
- Choose Create page.
You can also make pages from your writing (below) or from an idea (Develop an idea).
Templates
Templates give a page a type and a set of ready-made details, without copying any prose or links.
StoryShape includes eight starters:
| Starter | Details |
|---|---|
| Person | Role, Motivation, Conflict, Voice |
| Place | Landscape, Atmosphere, History |
| Faction | Purpose, Leadership, Resources |
| Object | Purpose, Origin, Limitations |
| Culture | Values, Customs, History |
| Rule | Scope, Costs, Exceptions |
| Event | Story time, Cause, Consequences |
| Term | Pronunciation, Usage, Etymology |
Make your own
Choose Templates… in the World toolbar.
- New template… starts from scratch: give it a Template name, a World entry type, and its Fields, each with a name, type and optional default.
- Customize beside a starter makes your own editable version.
- Save current page… turns the page you’re on into a template. Tick Use current detail values as defaults to keep its values.
- Apply to this page… adds a template’s missing details to the current page. Existing details and values stay as they are.
Under Your templates, choose Edit, Copy or Trash.
A World page
Each page has these sections.
Description
Choose Edit page to write or change the description, with B, I and U for selected text. Choose Save page. To change the page’s name, use Rename page….
Details
Details are structured facts, such as a character’s age or a kingdom’s ruler. Choose Add detail…, give it a Name, pick a Type, and fill in the Value. Detail types are:
- Text and Long text;
- Number;
- Yes / no;
- Choice, with options you list one per line;
- World entry, a link to another page, such as a character’s home town.
Choose Edit to change a value, or Remove detail then Confirm remove to delete it.
Books & canon
Every page has a series canon status: Provisional (the default), Canon, Unresolved or Retired. Use them to track what’s settled and what’s still in play.
If the project has several books, tick the books the page appears in. Each book can have its own canon status, or Inherit series. For example, a character can be Canon in book one and Retired in book three.
Sources
Passages captured from your writing appear here, with the book, chapter and scene they came from. Choose Open source passage to jump to the exact text.
Relationships
Relationships are named, one-way connections between pages: “Alice → knows → White Rabbit”.
- Choose Add relationship….
- Choose From and To, and type the Relationship or choose a preset: member of, located in, allied with, opposes, parent of, owns, knows, works for, trusts, rival of.
- Choose a Book context: Series-wide or one book.
- Add Notes (optional) and choose Save.
Direction matters: From → relationship → To. A relationship set for one book only shows when that book is selected.
Linked from
Linked from lists everything that refers to this page: scenes where it’s the point of view or location, scenes it’s present in, plot cards and notes linked to it, and other pages whose details point to it. Scenes and mentions… opens a fuller view. See Scenes and mentions.
Attachments
Attach file… adds a file, such as a reference image or a research PDF. The original is copied into the project and included in backups. Preview… shows it and Save copy… saves it elsewhere.
The inspector
The LORE DETAILS inspector edits the Series canon, Entry type, Aliases and Tags (both comma-separated). Choose Save details. Aliases help StoryShape recognize other names for an entry, such as “the Rabbit” for “White Rabbit”.
Change a detail’s type
To change a detail from, say, Text to Number, choose Convert type… beside it. Choose the New type and check the Proposed value; StoryShape doesn’t guess how to reinterpret it. Choose Review conversion, then Apply conversion.
The earlier value is kept. Conversion history… lists every change, with Restore previous definition & value.
Find a page
Type in Search World. StoryShape searches titles, descriptions, aliases, tags, details and captured passages.
Below the search are filters for Book, Type and Canon, and a sort button that cycles through name, entry type and recently edited. The type tabs (All entries, then one per type) narrow the list too. The ‹ and › arrows go back and forward through pages you’ve visited.
Connections
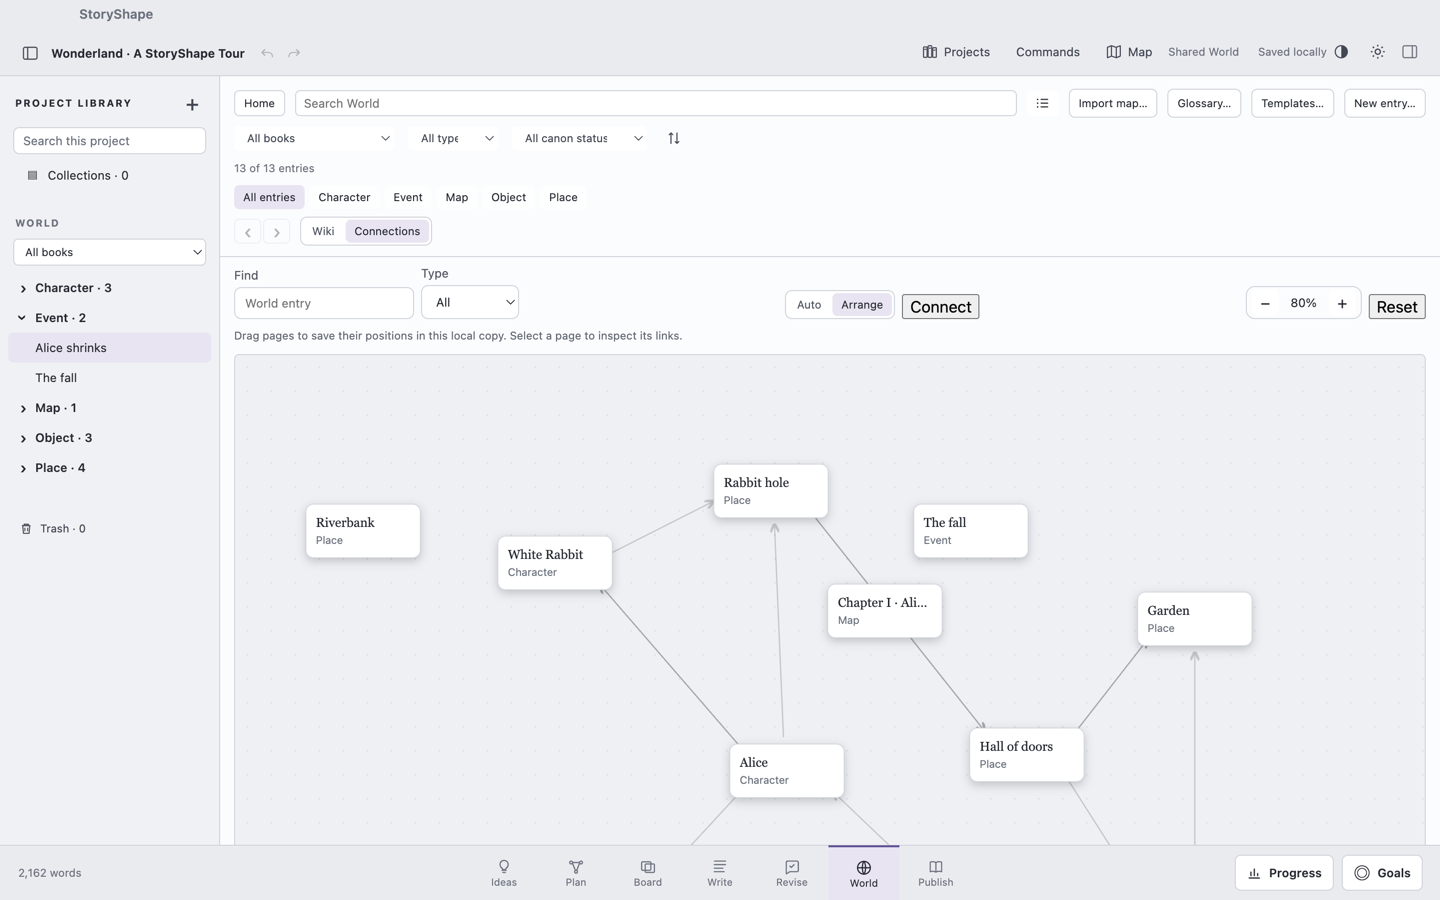
Choose Connections (beside Wiki) to see your World as a graph of pages and the links between them.
- Auto arranges linked pages for you. Arrange lets you drag pages where you want them; StoryShape remembers the layout on this computer.
- Find and Type narrow what’s shown.
- Use − and + to zoom, and scroll to move around. Reset restores the zoom and the automatic layout.
- Select a page to see its links, then choose Link… to add one or Open Wiki page to read it.
To draw a relationship, turn on Connect, then drag from one page and release on another. Name the relationship and choose Save.
Capture a detail from your writing
While drafting, you’ll invent things worth keeping. Capture them without leaving the page.
- In Write (or an idea), select the passage.
- Press Ctrl+Shift+W, or right-click and choose Add selected text to World….
- Choose New entry and give it a Name and Type, or choose Existing entry and pick the page.
- Add Additional information and Tags if you like. Open More details to add a typed detail at the same time.
- Choose Add to World.
The exact passage is saved on the page under Sources, linked to where it came from. A source is evidence, not automatic canon; set the page’s canon status when you’re sure.
Maps
Import a map image and pin places and events on it.
- Choose Import map… in the World toolbar.
- Choose a PNG or JPEG image, up to 32 MB.
- The map becomes a World page of type Map, named after the file. Rename map… changes its name.
On the map:
- Add pin… adds a pin, or turn on Place pin and click the map where it goes.
- Zoom with − and +, and choose Fit to see the whole map. Scroll to move around.
- Drag a pin to move it.
Each pin has a Name, a Color (Red, Amber, Green, Blue, Purple or Slate), a Book, a Story time, its position, Notes, and Linked originals: the World pages, scenes and plot cards it relates to. Pins appear as coloured dots; hover over one to see its name.
The MAP PINS inspector lists the pins, filtered by Book and Color. Select a pin to read its notes and open its linked originals. Show on map centres it. Edit pin… and Move to Trash are there too, and on the pin’s right-click menu.
Book journey
Tick Book journey to see a route through the pins linked to scenes, in manuscript order. Move the Through stop slider to follow the journey step by step. It’s a good way to check that travel times and distances make sense.
Map reference
Press Ctrl+Shift+M, or choose Map in the top bar, to open a floating Map reference from any workspace. Drag it by its title bar, choose which map to show, and filter or select pins without leaving your draft. Pins are edited in World; the reference is for looking. Esc or Close closes it.
Glossary
The project glossary holds the preferred spelling, pronunciation and definition of the words your world invents.
- Choose Glossary… in the World toolbar, or Workspace → Project Glossary….
- Choose New term….
- Type the Preferred spelling, an optional Pronunciation, a Definition, and any Aliases (one spelling per line).
- Choose Save term.
Each term is a World page of type Term. For single-word terms, Add spelling to dictionary stops the spellchecker flagging it.
Rename a page
Renaming a character halfway through a draft is common. StoryShape helps you update the prose too, but only where you choose.
- Open the page and choose Rename page….
- Type the New page name.
- Choose where to Look for mentions in: Included manuscript, World entries, Ideas and notes, or All editable text.
- Leave Match capitalization and Keep “old name” as an alias ticked, unless you don’t want them.
- Choose Preview mentions. Every mention of the old name is listed in context, unticked.
- Tick the mentions to change, or use Select all.
- Choose Rename page and update N mentions.
Unticked prose stays as it was. The page keeps all its links and connections. The search looks for the page’s current name only, not its aliases.
Scenes and mentions
On a page, choose Scenes and mentions… to see every scene that involves it, book by book:
- POV, Present and Discussed only are what you’ve declared with scene people.
- Text matches only means the name or an alias appears in the scene, but you haven’t declared anything.
Filter by Book, and tick Included manuscript only or Match capitalization. Open scene jumps to it.
Declarations and matches are different. A name in the prose doesn’t mean the character is physically there. StoryShape never changes your declarations because of a text match.
Books and series
A World is shared by every book in the project. A page counts as part of a book if you’ve ticked that book under Books & canon, given it a canon status for that book, or captured a passage from that book.
Use the Book filter in the World toolbar and library to see one book’s World. Maps use the same book filter for their pins.