StoryShape 1.0 · User guide
Write
User guide Part 5 of 13
Write is where the words go. Draft one scene, two side by side, or a whole chapter or book as one continuous page, with the formatting, fonts and tools a manuscript needs.
The manuscript library
Open Write from the footer tabs, or press Ctrl+4. The project library on the left shows MANUSCRIPTS: your books and everything in them.
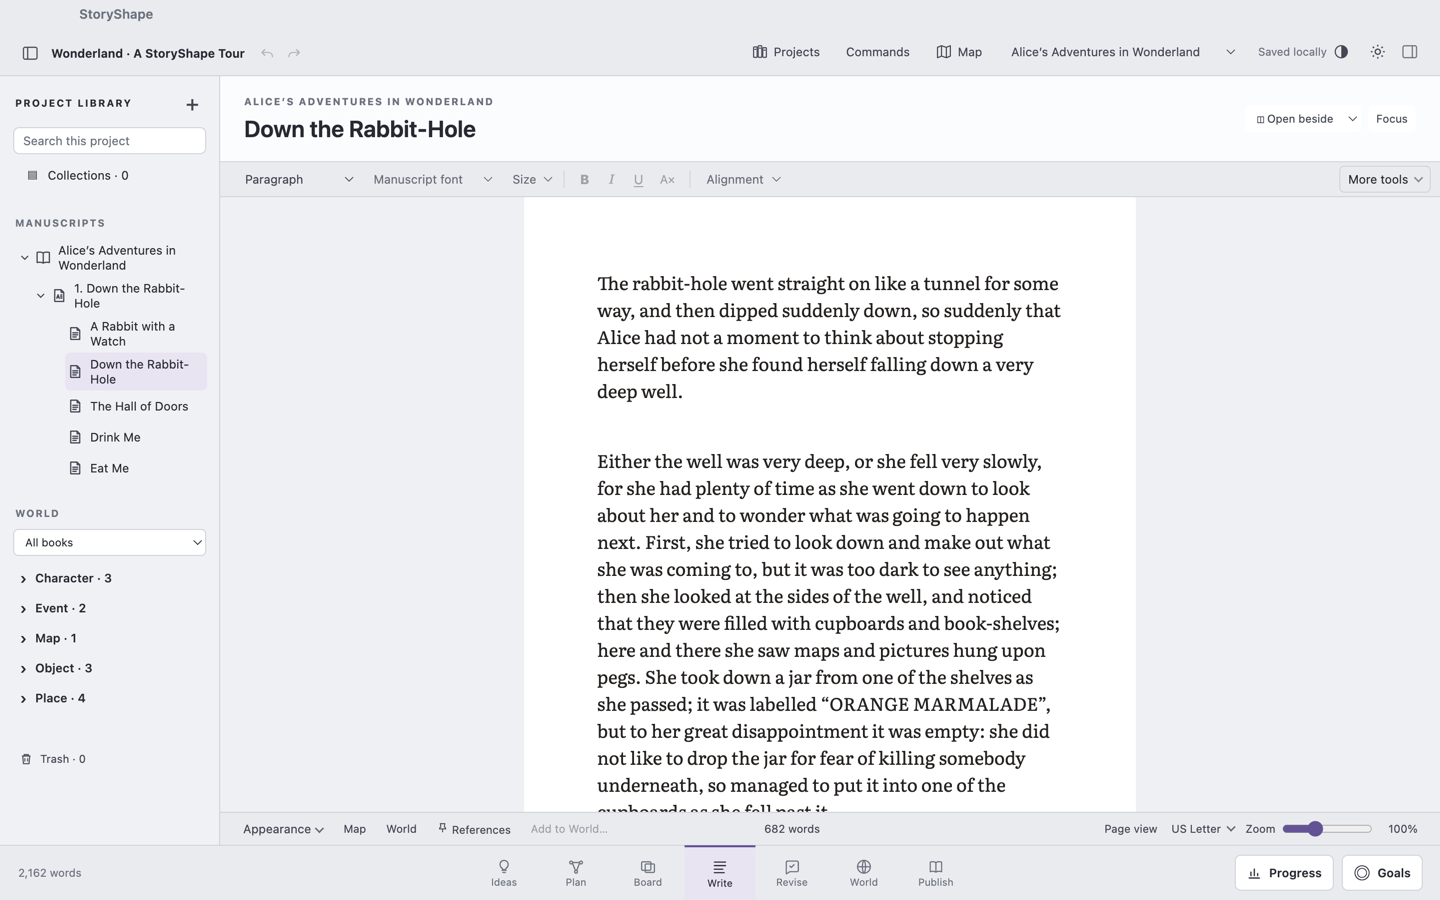
How a manuscript is organized
- A project holds one or more books.
- A book holds chapters, parts and folders, which can nest inside each other.
- Scenes hold the prose. A scene can sit in a book or in any chapter, part or folder.
The three kinds of container behave differently when you export or publish:
- A Chapter gets a chapter heading.
- A Part is a larger division with its own part heading and numbering.
- A Folder is just for organizing. Its name never becomes a heading.
To change a container’s kind, select it and choose Change role… in the inspector.
Add books, chapters and scenes
- Choose + at the top of the library, or right-click an item and choose Add.
- In Add to manuscript, choose the Item type: Book, Chapter or Scene. For a chapter, choose a Container type: Chapter, Part or Folder.
- Choose where it goes (Inside) and type a Title.
- Choose Add book, Add chapter, Add part, Add folder or Add scene.
Rename, reorder and move
- Rename: select an item and press F2, double-click it, or right-click and choose Rename…. Press Enter or ✓ to save, Esc to cancel.
- Reorder: drag an item. Drop it on the lower part of a book or chapter to put it inside; drop it higher to put it before. Or right-click and choose Move earlier or Move later.
- Move: right-click and choose Move to…, then pick where it goes Inside and its Position.
- Move several: Ctrl-click items to mark them (or Shift-click for a range). A bar shows how many are selected. Choose Move…, pick a destination, and choose Move items. You can also drag marked items together.
If moving scenes would take their plot links out of the plot’s book, StoryShape asks before moving them.
The library also works from the keyboard: arrow keys move between rows, → and ← expand and collapse, Shift+arrow keys extend the selection, and Shift+F10 opens an item’s menu.
Include or leave out
Every book, chapter and scene has Include in manuscript in the inspector. Leaving a scene out keeps it in the library but takes it out of word totals, continuous drafts, read aloud and default exports. It’s ideal for alternate versions and deleted scenes.
The right-click menu
Right-click any manuscript item for: Add, Rename…, Move to…, Move earlier, Move later, Add to collection, Pin as writing reference, Read aloud… (Windows) and Move to Trash. Scenes also have Add scene to Revision list, Add to Revision list and open markup, Edit scene people / POV… and Duplicate scene…. With several scenes marked, Merge N selected scenes… combines them.
Write a scene
Choose a scene in the library. Its title and word count appear above the page. Just start typing; the scene saves itself about a second after you pause.
If you want to save or undo right away, the header shows Unsaved changes with Discard and Save scene.
Books and chapters
Select a book or chapter and choose how to see it:
- Cards — a corkboard of what’s inside, in manuscript order. Each card shows its title, synopsis, draft stage and word count. Double-click a card’s synopsis or title to edit it right on the card (Enter saves, Shift+Enter adds a line to a synopsis, Esc cancels), or choose Edit. A single click opens the scene. Drag cards or use ← and → to reorder, and right-click for Open in Write and Move to….
- Scenes — every included scene, one after another. Choose Edit here (or click a page) to edit that scene; the others stay readable. Jump to scene takes you anywhere in the chapter.
- Continuous Draft — one editor across all the included scenes. Write straight through, select across scene boundaries, and format several scenes at once. Each scene still saves to its own original, and Scene boundaries buttons below the page jump to each one. Choose Save draft to save immediately.
In Continuous Draft, scene boundaries show as a blank line. Typing at a boundary adds to the end of the earlier scene, and deleting across a boundary removes text from each scene without merging them. To split or merge scenes, use the scene tools.
The writing tools
The bar above the page applies to the scene you’re editing.
- Paragraph — Body, Heading 1 to Heading 6, your saved styles, and Manage styles….
- Manuscript font and Size — the font and point size stored with the text, used when you export or publish.
- B, I, U — bold, italic and underline. With nothing selected, they turn the style on for the next words you type. Ctrl+B, Ctrl+I and Ctrl+U work too.
- A× — clear emphasis, headings and paragraph layout from the selection. At the caret, it resets the paragraph.
- Alignment — Left, Center, Right or Justified.
- More tools —
- Spacing & indents…;
- Paste supported formatting, Paste and match style, Move selection to Cuttings…, Browse Cuttings…;
- Add scene to Revision list, Open Revise workspace;
- Duplicate selected scene…, Split at insertion point…, Merge with next scene…, Open scene;
- Spelling & typing…, Scene snapshots….
The Edit menu has the same commands, plus Paragraph Style with every heading level.
Paragraph styles
A paragraph style is a saved set of formatting you can apply in one step, such as “Letter” or “Epigraph”.
- Choose Paragraph → Manage styles…, or Edit → Paragraph Style → Manage Styles….
- Choose New, and give the style a Name.
- For each property, choose Keep existing, Use default or a value:
- Semantic style (Body or a heading level);
- Bold, Italic, Underline;
- Alignment and Manuscript font;
- Font size · pt, Left indent · pt, Right indent · pt, First line · pt, Space before · pt, Space after · pt and Line spacing · ×.
- Choose Save style.
Apply a style from the Paragraph menu. Only the properties you chose change. Styles are saved with the project.
A style is a command, not a link. Editing a style later doesn’t restyle paragraphs you already applied it to. Apply it again to update them.
A negative First line value makes a hanging indent.
Spacing and indents
To change the layout of selected paragraphs without making a style, choose More tools → Spacing & indents…. Set Left indent, Right indent, First line, Space before, Space after (in points) and Line spacing, then choose Apply to paragraphs. These settings travel with the project and affect exports.
Manuscript fonts
The Manuscript font menu offers:
- On every computer: Times New Roman, Courier and Georgia;
- the 23 fonts included with StoryShape, grouped as Book serif, Display, Sans serif and Typewriter.
The included fonts are the same on every computer, and StoryShape includes them in PDF exports and the paperback. See the font library.
Manuscript fonts are part of your text. Draft appearance, below, changes only how the draft looks to you.
Page view or pageless
The Page view menu below the draft sets the paper you see while writing:
- Pageless — one continuous column, as wide as you like;
- US Letter (the default), A4, A5, 5 × 8 in, 5.5 × 8.5 in, 6 × 9 in, 7 × 10 in or 8 × 10 in;
- Page setup & margins… — choose a Paper size, a margin preset (Normal · 1″, Narrow · ½″ or Book · ¾″) or exact top, bottom, left and right margins up to 2 inches, then Apply page setup.
The Zoom slider (75% to 150%) magnifies the page; choose the percentage to go back to 100%.
Paper, margins and zoom are settings for your writing view on this computer. They don’t change your manuscript, unless you choose Use writing-view paper & margins when you export.
If a very long scene is too big for page view, StoryShape shows it as continuous text and suggests splitting it or using Pageless.
Draft appearance
Draft appearance is how the page looks to you while you write. It never changes your stored formatting or exported layout, so set it for comfort.
For quick changes, choose Appearance below the draft. Pick a preset (Studio, Book serif or Typewriter), set the View size, or tick Typewriter scrolling.
For everything, choose Appearance → Customize… or Workspace → Draft Appearance…:
- Under Start from, choose Studio, Book serif or Typewriter.
- Choose a Typeface: a preset, one of the included fonts, or a font installed on your computer.
- Set Text size (10–36), Line height (1.00–2.50), Paragraph spacing (0–24) and Column width (pageless view) (320–1200).
- Check the preview and choose Apply. Reset goes back to Studio.
To use a font installed on your computer, choose Show fonts on this computer… in the dialog. Your system may ask permission to list them. Draft appearance is saved on this computer, so a draft shown in an installed font looks different on a computer that doesn’t have it.
The font library
StoryShape includes 23 fonts, all under the SIL Open Font License. You can use them for drafting, paragraph styles, exports and Publish.
| Group | Fonts |
|---|---|
| Book serif | EB Garamond, Literata, Lora, Crimson Pro, Libre Baskerville, Merriweather, Alegreya, Cormorant Garamond, Spectral, Libre Caslon Text, Gentium Book Plus |
| Display | Playfair Display, Cinzel |
| Sans serif | Inter, Atkinson Hyperlegible, Nunito Sans, Work Sans, IBM Plex Sans, Lexend |
| Typewriter | Courier Prime, IBM Plex Mono, Cutive Mono, Special Elite |
A few good starting points: EB Garamond or Literata for literary fiction, Atkinson Hyperlegible if you want letters that are easy to tell apart, Courier Prime for a traditional manuscript, and Cinzel or Playfair Display for titles.
Focus mode and typewriter scrolling
Focus mode clears the screen around your words. It hides the top bar, the library, the inspector, references and the footer, and fades the writing tools until you move the pointer over them.
- Choose Focus above the draft, or Workspace → Focus Mode (F11 on Windows and Linux, ⌃⌘F on a Mac).
- Choose Leave Focus to come back.
A book or chapter shows its Scenes view in Focus mode. StoryShape remembers whether you were in Focus for each project.
Typewriter scrolling keeps the line you’re typing in the middle of the window, so your eyes stay in one place. Turn it on under Appearance → Typewriter scrolling, or choose Workspace → Typewriter Scrolling.
References
Keep something open beside your draft to read while you write: a scene from earlier in the book, a character’s World page, an idea or a Board note.
- Right-click an item anywhere and choose Pin as writing reference. Or choose References below the draft, then + to find and pin something.
- The REFERENCE pane opens beside the draft. Choose which Pinned reference to show.
References are read only. Open in workspace takes you to the original; Unpin removes it from the list. Drag the pane’s edge to resize it. You can pin books, chapters, scenes, World entries, ideas, boards, notes, plots and cards, attachments and map pins.
Open beside
Work in two scenes at once, for example to keep a scene’s opening in view while you write its echo.
- Open a scene.
- Choose another scene from ◫ Open beside above the draft.
Both scenes are editable, and each saves to its own original. Formatting and tools apply to the pane you last clicked in. To go back to one scene, choose the blank ◫ Open beside option.
World in this passage
While you write, the top of the inspector shows WORLD IN THIS PASSAGE: the World entries whose names or aliases appear in the paragraph at your cursor. Choose Open entry to pin that entry beside your draft, or Save mention to record this passage on the entry.
Add a passage to World
- Select some text.
- Press Ctrl+Shift+W, choose Add to World… below the draft, or right-click and choose Add selected text to World….
- Choose New entry (with a Name and Type) or Existing entry.
- Add Additional information and Tags if you like. Under More details, you can add a typed detail too.
- Choose Add to World.
The exact passage and its source are kept on the entry. More on the World page.
Find and replace
In the current text
Press Ctrl+F (or Edit → Find in Current Text…). Type in Find in current text; the bar shows “3 of 12”. Use ↑ and ↓, or Enter and Shift+Enter, to step through matches. Tick Match case if you need it. Choose Replace… to show Replace with, Replace and Replace all. Esc closes the bar.
Across the project
Press Ctrl+Shift+F (or Ctrl+H on Windows and Linux), or choose Edit → Find and Replace in Project….
- Type the Find literal text and what to Replace with. Leave it empty to remove the text.
- Choose where to Look in: Included manuscript, World entries, Ideas and notes, or All editable text. With more than one book, you can limit the manuscript to one Book.
- Tick Match case, Whole words, or Match equivalent Unicode spellings as needed.
- Choose Preview. Every match is listed in context, with the old text struck through and the new text beside it.
- Untick any you want to leave alone, or use Select all and Select none.
- Choose Replace N passages.
Nothing changes until you choose replace. Snapshots and captured World sources keep their original quotes.
Cuttings
Cuttings keeps prose you’ve cut but might want again. Cut text stays out of the manuscript and out of word counts.
To keep a passage:
- Select it in a scene.
- Choose Edit → Move Selection to Cuttings…, More tools → Move selection to Cuttings…, or right-click and choose Move selected text to Cuttings….
- Give it a Name and an optional note on why you kept it.
- Choose Move to Cuttings. The passage leaves the scene.
To reuse a cutting:
- Place the caret where it should go, or select text to replace.
- Choose Browse Cuttings…, then Browse and reuse.
- Find the cutting, then choose Reuse and match style or Reuse with formatting.
A cutting stays in Cuttings after you reuse it, so you can use it again.
Split, merge and duplicate scenes
- Split: put the caret where the new scene should start, then press Ctrl+Shift+Enter (or Edit → Split Scene at Insertion Point…). Check the titles of the First scene and the Following scene, then choose Split scene.
- Merge: choose Edit → Merge Scene with Next… to join a scene with the next scene in the same chapter. The second scene goes to Trash. Choose Merge scenes.
- Merge several: mark scenes in the library, right-click, and choose Merge N selected scenes…. The first scene is saved as a snapshot first.
- Duplicate: right-click a scene and choose Duplicate scene…. Give the Copy title, choose where to Append to, and choose Create copy. The copy starts excluded from the manuscript, which suits alternate drafts; tick Include the copy in the manuscript if you want it counted.
Save a scene before splitting or merging it. Every change can be undone.
Scene people and point of view
Record who is in a scene, separately from whose names happen to appear in it.
- Right-click a scene and choose Edit scene people / POV…, or choose Edit scene people… in the inspector.
- Choose the Point of view character.
- For each person, choose Present or Discussed only, or leave them Unassigned. People are your World entries of type Person; tick Other World types to show everything.
- Choose Save scene people.
These declarations appear on each person’s World page and can be used in collections.
Spelling and writing preferences
Spelling is checked as you type, using dictionaries on your computer. Nothing is sent online.
- Right-click a flagged word for suggestions, or choose Add spelling to project dictionary.
- Workspace → Spelling Review… lists every flagged word in the Whole draft, a book, a chapter or a scene. Choose Check this text, then Open word to jump to each one, or Add to project dictionary.
Workspace → Writing Preferences & Spelling… (or More tools → Spelling & typing…) sets these for the project:
- Underline misspelled words — live spelling on or off.
- Smart quotes — curly quotes as you type.
- Smart dashes — two hyphens become an em dash.
- Autocorrection — stored with the project.
- Show word goals and target prompts — see Turn goals off.
- Spelling language — System default or a dictionary. On a Mac, live spelling follows the languages set in macOS.
- Project dictionary — one word per line, such as your characters’ names. Choose Save dictionary.
Choose Save preferences. Preferences only affect what you type from now on; they never rewrite existing text.
Read aloud
Hearing your words read back is a good way to catch clumsy sentences. In StoryShape 1.0, read aloud uses the Windows speech voices, so these commands appear only on Windows. (The iPad edition reads aloud too; see StoryShape for iPad.)
- Select a passage and choose Edit → Read Selected Passage Aloud…, or right-click it and choose Read selected text aloud….
- To hear a whole scene, chapter or book, select it and choose Edit → Read Scene or Chapter Aloud…, or right-click it in the library and choose Read aloud….
In Listen to your passage, choose a Windows voice and a Reading pace, then Start. Use Pause, Resume and Stop. StoryShape remembers your voice and pace.
Read aloud uses the voices installed in Windows and works offline. To add voices, open Windows Settings → Time & language → Speech. In StoryShape 1.0, read aloud is available on Windows only; the iPad app has its own read aloud.
Paste and copy
- Paste (Ctrl+V) keeps bold, italic, underline and headings from other apps.
- Paste and match style uses the formatting around the caret instead. It’s in More tools, and Edit → Paste and Match Style (Ctrl+Shift+V).
- Copying from StoryShape into another app copies plain text.
Word counts
You’ll see word counts in several places:
- The footer: every included scene in the project.
- Below the draft: the scene you’re editing, live as you type.
- Above a scene: the saved scene.
- Cards and continuous views: included scenes only.
Help → How Words Are Counted… explains the rules, with live examples. The short version: included scenes count once; World entries, ideas, comments, snapshots, cuttings and Trash add no manuscript words. More on the progress page.